Are you looking for an easy way of installing Prestashop on a portable web server? Actually you could! I’ve discovered and tried out a Windows-based software that you could use and carry along with you on a USB stick wherever you go. So read further below if you’re interested with this kind of thing.
Some Bits About Prestashop
It’s a Shopping Cart solution that you could use to build your own Online Store. I’ts free and open source, which means you don’t have to buy the software or purchase a license for you to use it. Furthermore, the source code is not encrypted, that means you are free and able to modify the codes and add some features and functions for it. Provided that you have a knowledge in PHP, MySQL, JavaScript, HTML, CSS or Smarty Template System.
It’s a software, just like any other software that you need to install on your Windows, Mac or Linux Desktop Computers.
Like OpenCart, Prestashop is also written in PHP and that you have to install it on a Web Server with all the necessary PHP modules and extension. You could install the software on a localhost or local computer (on a Web Server iinstalled on your local computer), Shared Web Host, Virtual Private Servers or VPS, or Dedicated Servers.
It has a modular architecture that let’s you add some features and function to it by just installing an add-on, module or extension. Such modules/add-ons categories are; payment gateways, seo plugins, data backup and restore plugins and so much more.
When it comes to themeng, you could easily change your online store theme by logging in to your back office or administration page and select the theme you like and apply it. If not satisfied with the Themes shipped with Prestashop, then you could purchase a ready-made or custom-made theme made by various Prestashop Theme Developers.
System Requirements
You need these requirements in order for you to install Prestashop successfully.
Webserver On a Local Computer
Installing Prestashop on a local computer, you must have the following:
- Windows, Mac or Linux OS
- A pre-packaged Web Server (Wamp, Xampp or Mamp)
- Web Server is either Nginx or Apache v2.x
- PHP version 5.2 or above
- MySQL 5.0 or above
OPTIONAL PHP Extensions:
GD, cURL, SimpleXML, SOAP
Web Host On The Internet

To install it on a web host so you everyone on ther Internet can view it you need the following:
- A domain name (you need to register a unique name)
- Web server: Apache 2.x or Nginx
- PHP 5.2+ installed and enabled
- MySQL 5.0+ installed with a database created
- FTP access (ask your hosting service for your credentials)
- SSH if you’re on a VPS or DS
OPTIONAL:
- Memory_limit to “64M” and file_max_upload_size to “16M”
- SSL certificate if you plan to process payments internally (not using PayPal for instance)
- PHP extensions: GD, cURL, SimpleXML, SOAP
- MemCached, mcrypt PHP extension – To improve performances
Installation
For this guide, I’m going to show how you would install it on a Windows-based computer. I’m going to use a portable web server called USBWebserver.
You could actually download and extract the files and store it in your USB drive and carry it along with you and plugin to whatever computers you might wanna use. It’s really is a portable Web Server, very useful for testing and development purposes, before getting your online store online.
Before starting of with the procedure, you must have already downloaded the latest Prestashop software and had extracted.
Procedures
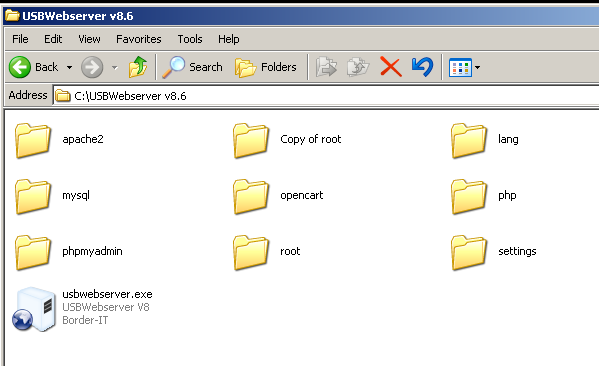
Step 1: Download and extract USBWebserver v8.x from this page.
To where you need to extract the ZIP file? It’s really up to you. But for the sake of demonstration, I’ve extracted the ZIP file to my local
C:drive.So it would look like this…
C:\USBWebserver v8.6Reference Image: [jig ids=”2030″]

Step 2: Create Prestashop folder.
Create a new folder named
prestashopinside ofC:\USBWebserver v8.6folder.Step 3: Change Apache Port and other settings.
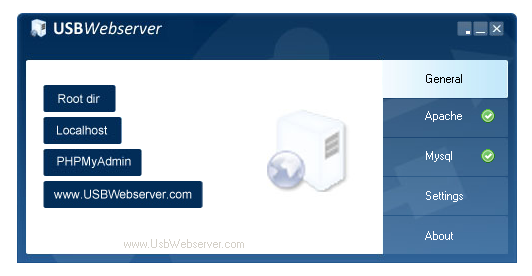
While still on
C:\USBWebserver v8.6folder, launchusbwebserver.exeby double-clicking on it.Reference Image:
Once opened, click on
Settingsmenu and change the value forRoot dir.Change
{path/root}to {path/prestashop}.Change
Port apachevalue from8080to80. If you have other Web server running on your localhost, then you must retain the existing value or change it to something else (i.e. 8081).Click on Save button and click OK on the next prompt.
Step 4: Restart Apache.
While still on the program window, click on
Apachemenu wih red exlamation point, then click on the greenSTARTbutton. Wait a few seconds and you should see that Apache menu with red exlamation point turn green. That indicates that Apache has restarted.Step 5: Copy Prestashop files to web server root.
Go to the path where you extracted the
prestashop_1.x.0.xx.zip.Copy all the files and folders that is inside the
prestashop_1.x.0.xx\prestashopfolder.Paste it to
C:\USBWebserver v8.6\prestashop.Step 6: Create a database.
Go back to USBWebserver program window, click on the General tab then click PHPMyAdmin button.
That should open a browser window/tab and opens up PHPMyAdmin page.
Login using the following default login credentials:
Username - rootPassword - usbwUpon logging in, click on Users and then click Add user link menu.
Now fill up the form, similar to the following:
User Name - prestashopdbHost - localhostPassword - your-passwordRetype - retype-your-passwordScroll down a bit and continue filling the following:
Create database with same name and grant all privileges– ticked or checkedGrant all privileges on wildcard name ...– ticked or checkedGlobal privileges– clickCheck AllThen scroll down a bit more and click on Go button located at bottom-right most of the page.
You have now created a database for your Prestashop installation. You’ve created a new user named
prestashopdband at the same time you also created a database namedprestashopdb, with the necessary privilges.Now you’re ready to install Prestashop.
Step 7: Initiate the installation.
Fire-up your browser and point to
localhostand hit ENTER key.You should see a web page similar to the image shown below
Reference Image:
Scroll down a bit and click on the green button labeled
Next. It’s located at the bottom right-corner of the page.On the next screen, you have to accept the Prestashop License Agreement. Tick on the
I agree to the above terms and conditioncheck-box and click on theNextgreen button.On the next screen, fill up the information about your online store.
Reference Image:
You need to fill up the following entries:
- Shop name
- Main Activity
- Country
- Shop timezone
- First Name
- Last Name
- Email Address
- Shop Password
- Re-type to confirm
Then click on the
Nextbutton.On the next screen, you need to enter your database details. In my case, I filled these up like so:
- Database Server Address –
localhost:3307 - Database Name –
prestashopdb - Database Login –
prestashopdb - Database Password –
prestashopdb - Table prefix –
ps_
Reference Image: [jig ids=”2055″]
Test your database details and see to it that is correct, click on the
Test your database connection nowbutton to test your entered details.When all is entered correctly, you should see a screen similar to this one:
Reference Image:
Click Next button whenever you have a successful database connection.
Prestashop should start installing now.
Reference Image:
You should see a confirmation text saying Your installation is finished!, after a successful installation.
If you see a screen similar to the image show below…
Congratulations, you didi it!
You can now login to your back-office or the administration page of your website by clicking on the Manage your store button.


That’s a Wrap!
See how easy it is to insall Prestashop on a local computer, of course, this won’t be possible without the help of USBWebserver software.
Now, if you decide to transfer your local Prestashop website to another computer and run in from there, then you only need to copy the whole USBWebserver folder to a USB drive or External Hard Drive and launch the program from there.
This is very useful for local testing and development purposes.
I’ve also written a guide on how would you install openCart on a portable webserver, jus click on the link to read the article.
PLUS! You could also use this guide to install Magento Community Edition and make it portable.