Step-by-step guide for newbies, on osTicket installation (the free help desk software) using Ubuntu Server. You could follow this guide using Linux-based machine or server on your local area network, or on a Cloud VPS hosted by companies like; DigitalOcean, Linode or Vultr. You could also use a virtual machine if you want to.
Jump Links
- Latest Version
- Requirements
- DNS Record For Sub-Domain
- Procedure Using Ubuntu 16.04
- Step 1: Create the Droplet
- Step 2: Login to your Droplet/VPS
- Step 3: Purge/remove PHP version 7.0
- Step 4: Add PPA Repo and Install PHP 5.6
- Step 5: Download and extract osTicket
- Step 6: Copy the osTicket core files to Apache’s web directory
- Step 7: Create a database using commandline
- Step 8: Install osTicket using the web-based install wizard
- Free SSL For osTicket
- Answers To Common Issues
- YouTube Video Demo
In this guide, I’ll discuss the steps using a cloud-based Ubuntu Server, particularly Ubuntu 16.04 Server Edition. My client machine shall be Linuxmint – an Ubuntu-based Linux Distro. If you’re on Windows, you need to install SSH client like Putty, to let you connect to the remote server via SSH protocol.
If you want to use a Cloud VPS instead of a local machine, then I would recommend DigitalOcean as your provider. Because setting up a LAMP Stack on this host would be quick and easy using their “One-click Apps” feature. It should let you bring up an instance of Apache, MySQL and PHP without manually typing commands. DO is one of the best cloud vps provider out there on the Internet. I’ve been using their service for couple of years now and not a single ticket or support request was sent to them.
If you opt to use your own machine as server, then skip to Step 2. Otherwise, start off with Step 1, which require you to have an account with Digital Ocean. Use my special link to sign up for an account and you should get additional credits worth $10. You can use this to test osTicket on the cloud for more than a month. When you decide to continue using it, then just top up your account.
Note: When you create your Ubuntu 16.04 Droplet or VPS using DO‘s “One-click app” feature, you should get a free SSL certificate along with your VPS – but you’ll have to set it up.
The free SSL Certificate is brought to you by Letsencrypt.
For this to work, you need install few things, but DO got you covered and pre-installed everything so “Let’s Encrypt” would work for you. Isn’t that awesome!
But you need to further set it up.
Requirements for osTicket Cloud VPS Installation
- Web Server: Apache 2.4 or later
- PHP 5.6 (v7.0 is not supported yet – as October 2016)
- MySQL 5 (or later)
- A Cloud VPS with at least 5GB of RAM – you need more once you go on production and traffic grows.
As additional requirements for this guide:
Email account – for signing up for Digital Ocean>
DigitalOcean Account with at least $10 credit
Puttygen if you’re on Windows
Domain Name (Optional) – if you decide to use it in production along with your Web site.
Note: You won’t be able to use Letsencrypt with your osTicket instance if you don’t properly configure your DNS. Though, you can still install and access your instance using the IP address of your VPS.
For a production environment, you need to have a DNS record for the VPS that should hold the osTicket instance. Read below to know how I set up my DNs Record for
support.chubbable.com.
How Do I Setup My DNS Record
First, you need an overview of my setup. Then one I’ve used for this specific guide.
My Setup Overview:
- My Domain Name is hosted by another Registrar
- My Cloud VPS Host is DigitalOcean – so my main domain “chubbable.com” and “support.chubbable.com” has their own VPS.
- My osTicket Instance is on another Droplet or VPS
- A separate “A Record” was configured
- My sub-domain name for osTicket is
support.chubbable.com
For those who knew how to set their own DNS record, you may skip this part. For the newbies, read further carefully. Also refer to your specific Domain Registrar and read their help documents related to DNS Records.
If you have an existing domain which is currently hosted by another company – this guide would work for you by creating an “A Record” from your Registrar’s Admin Dashboard. Then idea is – point your sub-domain to the IP address of your osTicket VPS. Steps varies for various Registrars, make sure to read your Registrar-specific guide.
With my specific case, I only had to add “A Record” for support and pointed to my osticket IP Address. I’ve done this using DO‘s networking setup page. My registrar was set to use DO‘s Name Servers.
The setup page should look like these:
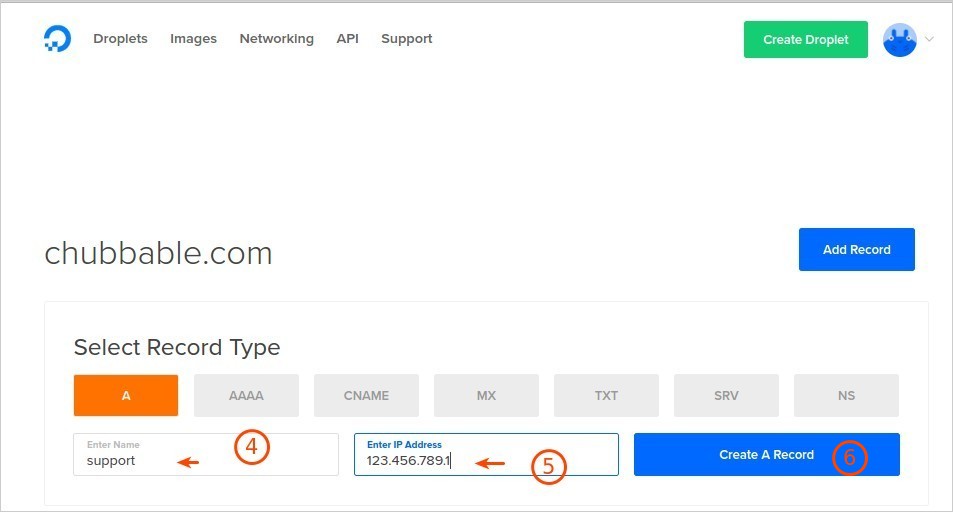
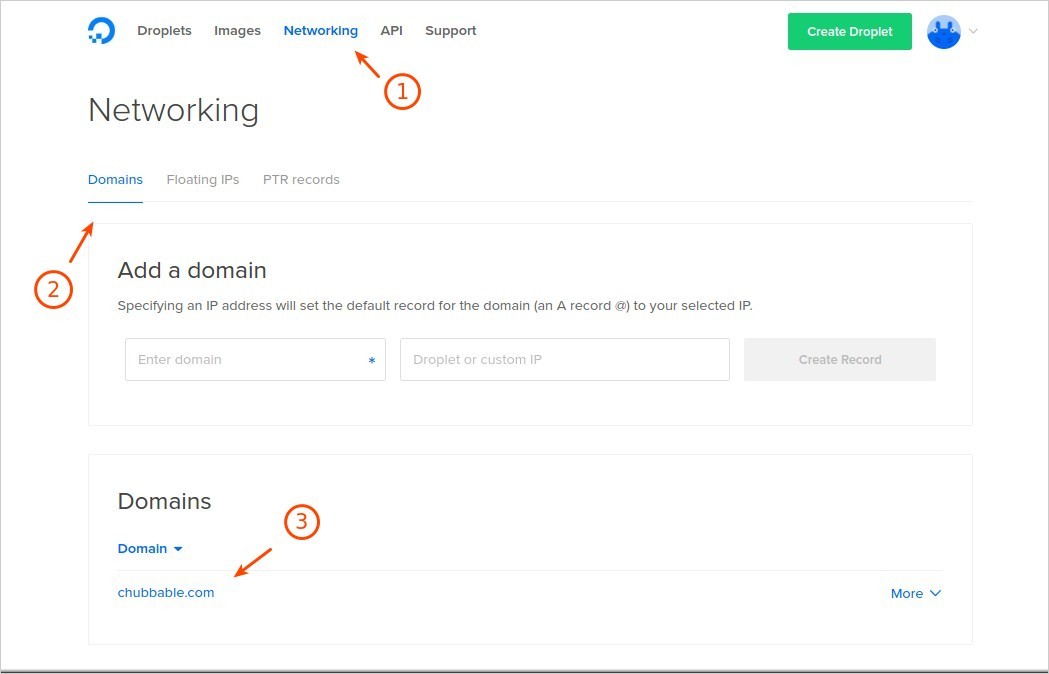
With this kind setup, I was able to point support.chubbable.com to my osTicket VPS.
osTicket’s Latest Version
The latest version of osTicket, at the time of writing this post is, v1.10 (Released November, 1st, 2016) – which you can download from this page.
The Step-by-step Guide
Please read the following instruction, word for word to successfully setup osTicket using Ubuntu 16.04. Steps would also work for Debian-based VPS.
You may need to familiarize yourself first with the commands used in this guide.
Commands Used:
cp– copy files from and to any locationmv– move any files from and to any locationchown– set owner for files/directorieschmod– set permission for files/directoriesfind– search files or directory, then execute a command using-execExample:
find /var/www/html -type d -exec chmod 755 {} \;Where
find "location"– substitute location for the location you want to apply the command. It’s safer to just use the full path, so you can use it wherever you’re at in your command prompt.
Step 1: Create the Droplet
Droplet is what they call for a VPS instance in Digital Ocean. To create one, simple click the Create button.
Then on the next page, under the Create Droplets heading, click on One-click Apps, then choose LAMP on 16.04. This should install a 64-bit version of Ubuntu 16.04 Server along with Apache, MySQL and PHP.

LAMP Stack on Ubuntu 16.04
Scroll down a little further and Choose a Size – pick the 1GB package. Then choose your preferred data center region, pick the one closest to your target audience. You could pick from; New York, San Francisco, Amsterdam, Singapore, London, Frankfurt, Toronto or Bangalore.
Further down you may choose to use your SSH keypair by copy/pasting your SSH public key on the placeholder. If you don’t provide one, then your SSH user name and password shall be sent to you via Email. You have to change your root password immediately after logging in for the first time.
Note: For a production environment, you MUST use your own SSH keys when connecting to your remote server.
Next, type your preferred Host Name, in my case it’s osticket. But in production, I would use support.chubbable.com

DigitalOcean – Entering Your Hostname
Finally, hit the Create button and wait for a few seconds. Yes, it only takes a few seconds to build your VPS.
Step 2: Login to your Droplet/VPS
Login to your VPS to check things out and make sure LAMP is working.
When you SSH for the first time, you’d be asked to change your password (if you didn’t use your Public SSH Key). So copy the password that was sent to you then paste it on the terminal. You could use middle-mouse button to paste the password. Once done, enter your new password twice. Take note, that when you type your password, it won’t printed on your screen. It’s some Unix security measure.

Changing Your Root Password
Note: I’d like to stress that you should use a key-based SSH login regardless, whether test or production environment. It’s more convenient, secure and easy to use than a password-based login.
Once logged in, purge PHP 7.0 since it is not yet supported by osTicket. Using this specific version will throw Error 500 error when installing osTicket. We have to do this when using Ubuntu 16.04, since PHP 7.0 comes shipped with it.
But before doing the procedure, take your time to configure your LAMP installation. When the first you login in you should see similar message like this:
-------------------------------------------------------------------------------

Thank you for using DigitalOcean's LAMP Application.

LAMP has now been enabled. You can access your LAMP instance at:
Your web root is located at /var/www/html and can be seen from
  http://your.vps.ip.address

The details of your PHP installation can be seen at
  http://your.vps.ip.address/info.php


The "ufw" firewall is enabled. All ports except for 22, 80, and 443 are BLOCKED

You are encouraged to run 'mysql_secure_installation' to ready your server for production. The passwords for MySQL have been saved to:

/root/.digitalocean_password

Let's Encrypt has been pre-installed for you. If you have a domain name, and you will be using it with this 1-Click app, please see:

http://do.co/le-apache

-------------------------------------------------------------------------------

You can learn more about using this image here: http://do.co/lamp

-------------------------------------------------------------------------------
To delete this message of the day: rm -rf /etc/update-motd.d/99-one-click

The programs included with the Ubuntu system are free software;
the exact distribution terms for each program are described in the
individual files in /usr/share/doc/*/copyright.

Ubuntu comes with ABSOLUTELY NO WARRANTY, to the extent permitted by
applicable law.
Notice the message above where it says “run mysql_secure_installation” – just do as it says. But before doing so, take note of your root MySQL password which should be located at /root/.digitalocean_password.
To view your MySQL Password, type this on your terminal:
cat /root/.digitalocean_password
Sample Output:
root_mysql_pass="your-password-here"
Moving forward, run mysql_secure_installation and paste in your password, the one you just copied using the cat command.
Hit Enter key and a question should be asked like so:
VALIDATE PASSWORD PLUGIN can be used to test passwords
and improve security. It checks the strength of password
and allows the users to set only those passwords which are
secure enough. Would you like to setup VALIDATE PASSWORD plugin?
You could answer NO here by pressing n key then hit enter.
A series of question will be asked:
Remove anonymous users?– answeryfor yesDisallow root login remotely?– yesRemove test database and access to it?– yesReload privilege tables now?– yes- …then it should say all done!
Now, we are ready to work on the osTicket Installation using our LAMP Stack on Ubuntu 16.04
Step 3: Purge/remove PHP version 7.0
Like I mentioned before, PHP 5.6 is not yet compatible with latest version osTicket (v1.10 – Latest Stable Release, Released November, 1st, 2016), so we need to purge or remove PHP 7.0 since it came with the LAMP Stack installation.
Type the following command (or copy/paste it) to remove PHP 7.0 from your Droplet/VPS
apt-get purge php7.0-common
Sample Output:
Reading package lists... Done
Building dependency tree
Reading state information... Done
The following packages were automatically installed and are no longer required:
  fontconfig-config fonts-dejavu-core libfontconfig1 libgd3 libjbig0 libjpeg-turbo8 libjpeg8 libtiff5 libvpx3 libxpm4
Use 'apt autoremove' to remove them.
The following packages will be REMOVED:
  libapache2-mod-php* libapache2-mod-php7.0* php* php-apcu* php-common* php-gd* php-mysql* php7.0* php7.0-cli* php7.0-common* php7.0-gd*
  php7.0-json* php7.0-mysql* php7.0-opcache* php7.0-readline*
0 upgraded, 0 newly installed, 15 to remove and 14 not upgraded.
After this operation, 14.7 MB disk space will be freed.
Do you want to continue? [Y/n]
Of course you want to continue, so press y then hit ENTER.
Once done, type php -v – you should get the following response:
The program 'php' can be found in the following packages:
 * php7.0-cli
 * hhvm
Try: apt install <selected package>
That’s great, we can now install PHP 5.6 – the version that osTicket currently supports.
Step 4: Add PPA Repo and Install PHP 5.6
To install php5.6, we must first add the proper repository. Type this on your terminal, one at a time:
add-apt-repository ppa:ondrej/phpapt-get updateapt-get install php5.6 php5.6-cli php5.6-mysql php-gettext php5.6-mbstring php-xdebug libapache2-mod-php5.6 php5.6-gd php5.6-imap php5.6-xml php5.6-intl php5.6-apcu unzip -yThe command should install and satisfy all the required and recommended packages:
php -v– to check php 5.6 installation, sample output below:Sample output:
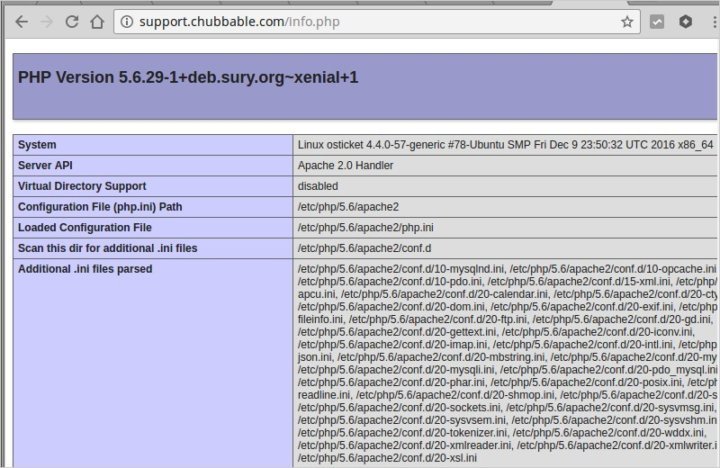
PHP 5.6.29-1+deb.sury.org~xenial+1 (cli)
Copyright (c) 1997-2016 The PHP Group
Zend Engine v2.6.0, Copyright (c) 1998-2016 Zend Technologies
with Zend OPcache v7.0.6-dev, Copyright (c) 1999-2016, by Zend Technologies
with Xdebug v2.5.0, Copyright (c) 2002-2016, by Derick Rethans
Note? If PHP still shows up as
PHP 7.1.0orPHP 7.0– that’s okay for as long as5.6is enabled. For DigitaOcean users, access your URL likeyourdomain.tld/info.php. You should notice that5.6is the one active. See sample image.
PHP 5.6 Enabled
But some people may still ask…
I’ve already purged
php7.0but I still see it when doingphp -v?For some reason unknown yet to me, after installing php5.6,
php7.*-commoncame back installed on the VPS. This wasn’t the case a few months ago.It’s perfectly safe though. But if you really want to get rid of it, you could do the following:
apt-get purge php7.0-common -y– if you see PHP 7.0 or 7.0.xapt-get purge php7.1-common -y– if you see PHP 7.1 or 7.1.x
Then do a
php -vcommand to check your PHP version. It should now show asPHP 5.6.xRestart Apache, then you’re Done!
To restart apache:
service apache2 restart
Note: When doing add-apt-repository ppa:ondrej/php, you’ll notice a warning like this:
WARNING: add-apt-repository is broken with non-UTF-8 locales,
see https://github.com/oerdnj/deb.sury.org/issues/56 for workaround:
If you’re using UTF-8 Locales in your VPS (ie. en_GB.UTF-8), then you should be good to go. So hitting Enter key would produce positive effect and the ppa repo should be added. Please refer to the sample output below.
BUT if you’re not using UTF-8 locales or otherwise knows as non-UTF-8 locales – you could encounter some error within the PPA Key name – where Ondřej Surý is displayed as Ond\xc5\x99ej Sur�
So in case you were using non-UTF-8 locales – you should invoke the following command when adding the php5.6 repo:
apt-get install -y language-pack-en-base
hit Enter key then…
LC_ALL=C.UTF-8 add-apt-repository ppa:ondrej/php
hit Enter key – and follow sub-steps 2 and 3 above
Sample Output:
gpg: keyring `/tmp/tmptbhqemjf/secring.gpg' created
gpg: keyring `/tmp/tmptbhqemjf/pubring.gpg' created
gpg: requesting key E5267A6C from hkp server keyserver.ubuntu.com
gpg: /tmp/tmptbhqemjf/trustdb.gpg: trustdb created
gpg: key E5267A6C: public key "Launchpad PPA for Ondřej Surý" imported
gpg: Total number processed: 1
gpg:               imported: 1  (RSA: 1)
OK
Step 5: Download and extract osTicket
You could download the zip file directly from this link: http://osticket.com/sites/default/files/download/osTicket-v1.10.zip
But I strongly recommend that you checkout the latest in http://osticket.com/editions – fill out the form in case you haven’t done it yet.
For the sake of this guide, we will download the file directly to our VPS using the wget command. To download the file, simply type:
cd ~ && wget http://osticket.com/sites/default/files/download/osTicket-v1.10.zip
The file should now be in your root’s home folder. To check it out, you could type cd then do ls -l or ls -l ~. Or just ls -l if you’re on the root home folder. Meaning, your prompt must look similar to this:
root@support:~#
Next, extract the file osTicket-v1.10.zip using the unzip command. Make sure you’re on the root’s home folder.
The command should be:
unzip osTicket-v1.10.zip -d osticket
That should extract the files inside osticket directory. Do a ls -l command and you should be able to see the folder.
Now, inside the osticket directory you should see two folders named scripts and upload. You can check those by invoking this command:
ls -1 ~/osticket
Sample output:
scripts
upload
To check the contents of upload folder (the actual osTicket core files):
ls -1 ~/osticket/upload
Step 6: Copy the osTicket core files to Apache’s web directory and set necessary permission.
Copy all the files inside upload folder to /var/www/html – this is our default Apache Web Root Folder. This might not be the case if you’re using another VPS provider/host or had used another script to build your LAMP VPS.
The command should be:
cd osticket/uploadcp -r . /var/www/htmlcd /var/www/htmlcp include/ost-sampleconfig.php include/ost-config.phpchown -R :www-data .find . -type d -exec chmod 755 {} \;find . -type f -exec chmod 644 {} \;chmod 0666 include/ost-config.php
Step 7: Create a database using commandline.
With this guide, we did not install phpMyAdmin instead, we’ll be using just the commandline – which is fairly easy to use for this specific task.
Prepare your MySQL root password – it should be located in /root/.digitalocean_password. Use cat /root/.digitalocean_password – to retrive your password.
In case you’ve changed your root password, then prepare to enter that on the following steps.
So let’s move on and create a database for osTicket.
Login as root user and enter your password. Typing your password won’t be printed on screen.
The command should be (you should get a Query OK, message for every command):
mysql -u root -p– then enter keyPaste or Enter your password
You’ll get to
mysql>prompt when login is successful.create database ost;To create a database named
ost– as in osticket. You could name yours differently.grant all on ost.* to 'ost'@'localhost' identified by 'yoursecretpassword';yoursecretpassword– You have to use your own secure password.flush privileges;quitYou should be back to your previous prompt (
root@yourhostname:~#)Next… the osTicket Web install part.
Step 8: osTicket Installation using the wizard
Now that you have done the necessary file/directory permission and the database, we’re now ready to install osTicket. So fire up your favorite browser and head over to your VPS web address. If you’re just playing around you could use the IP address of your VPS or any free domain name. But if you intend of using it in production, then you should’ve prepared the necessary DNS settings so you could use the proper url for your support system.
In my case, I setup support.chubbable.com to be my osTicket Support URL. It is forwarded to my osticket VPS – the one I created earlier.
When everything is done correctly, accessing your support url should open the osTicket installation wizard. If you followed the php5.6 installation steps carefully then everything required including recommended packages should have a green colored check on them. See this reference image below.

osTicket Requirements – All Green
If no issues found, click on the Continue button and follow the rest of the steps, which should be easy to follow.
Fields To Fill Out;
System Settings:
Helpdesk Name:i.e. Chubbable’s Help DeskDefault Email:i.e. [email protected]You need to setup your own domain attached email address, so you could have an email address with your domain name attached to it. But for the meantime, you could use any Gmail account and configure Forwarding later. Postfix should be use for this part to send out email from the VPS.
Will do a guide on how to do this later, depending on my availability and motivation. I’ll discuss how you would attach your osTicket to 3rd-party email host like Mailgun, Mandrill, Zoho Mail and the like.
Admin User – Pretty simple to fill out, no further explanation needed. But take note that you have to fill the Email address for the admin user. It should be a real and working one.
Database Settings:
MySQL Table Prefix: you may leave this as it is, unless you know what you’re doing.
MySQL Hostname:
localhostMySQL Database:
ostor use whatever you configure when your created your database.
MySQL Username:
ostor use whatever you configure when your created your database.
MySQL Password:
your-passwordClick on Install Now, whenever you’re ready.
If you encounter
Unable to connecterror for MySQL – double check your database name, user and password. Make sure you created those database details properly using these steps.You should be taken to the Congratulations! page, if you installed osTicket successfully.

Screen 1 – osTicket Installation
Lastly, don’t forget to change the permission for
include/ost-config.phpfile – set it to read-only mode. Also delete thesetupfolder from your web directory.To do so, invoke these command, regardless of your folder location:
chmod 644 /var/www/html/include/ost-config.php– to set the file in read-only moderm -rf /var/www/html/setup/– to remove the setup folder.And that’s it! You can now visit your front-end or your admin/staff dashboard by simply following the link posted on the bottom of the
Congratulations!page.In my case it says…
Your osTicket URL:
http://support.chubbable.com/Your Staff Control Panel:
http://support.chubbable.com/scp

Securing your osTicket Virtual Private Server
When using DigitalOcean, firewall shall taken care of automatically while your droplet or VPS is being created. But that only happens when you use the One-click app feature.
If you type this in your terminal: ufw status – you should be able to see which ports were firewalled. You have to take care of this manually if you choose to only create a bare Ubuntu 16.05 server.
Now, for additional security once you decide to go on production, you need to do some extra effort to secure your server. And those are mentioned in my other post listed below.
Please read on the following server hardening tips:
Use a Free SSL on osTicket – Letsencrypt
Letsencrypt – is an open certificate authority (CA), providing automated and free SSL certificate for our benefit. The benevolent ISRG is the one providing this not-only free but excellent service. And because of this awesome service, we are able to secure our website traffic through HTTPS (SSL/TLS), in the user-friendly way.
Take note though, that you need a valid/registered domain name for this to work. You won’t be able to use this on a local server, be it a physical machine inside your Intranet or a Guest VM in your VirtualBox.
Alright, here comes the fun part… SSL installation.
Follow the easy and simple steps below.
Installing the FREE SSL
Please consider becoming a Sponsor for Let’s Encrypt SSL.
To install the free Letsencrypt SSL, you need to login or SSH your way to your DigitalOcean Droplet or VPS. Let’s assume you’re using the root user, commands entered here shall not be prefixed with sudo.
Thare are no complicated and multiple steps to be done here, since DO has taken care of those when we create the Droplet using the One-click app feature.
Make sure your domain is reachable via the public DNS, then invoke the following command:
letsencrypt --apache -d support.your-domain.tld
In my case:
letsencrypt --apache -d support.chubbable.com

Letsencrypt Install Command
In my case my osTicket domain is support.chubbable.com – for the purpose of guide, I will use this domain. I will delete and take this domain down after posting this guide.
You’ll be ask to enter your email address. Make sure to enter your personal email address, because it will be used to send notifications to. That includes error and expiry notification, like this one.

Letsencrypt Email Notification
Next, agree on the Terms of Service. You need to use your TAB key to selec/highlight the Agree button.

Letsencrypt TOS
Next screen should ask you if you want whether “HTTPS access is required or optional. If you choose required, then the SSL installer will automatically do its job to configure your apache settings and make the http-to-https redirect automatically for you. But if you want full control of this, then choose optional and do the redirection yourself.

Letsencrypt HTTPS redirect option
Installation should continue and you’ll end up seeing this image below (congrats! you did it.):

Wanna see how it looks like? Image below – Look how nice looking green padlock icon.

Letsencrypt in Action
SSL Certificate Expiry and Renewal
Take note that your Free SSL Certificate will expire in 60-days. Make sure you entered the right and working email address when you install the certificate. Notices for expiration will be sent to that email address.
Now, to renew your certificate before it expires, you need to simply invoke the command letsencrypt renew. Of course you need to login to your VPS and type this on your terminal. It is recommended that you renew your certificate every 60 days.
If you type the command now or within 59-days after initial install, letsecnrypt would just say ie:
    Processing /etc/letsencrypt/renewal/support.chubbable.com.conf

    The following certs are not due for renewal yet:
      /etc/letsencrypt/live/support.chubbable.com/fullchain.pem (skipped)
    No renewals were attempted.
You could set a cronjob for this to conveniently renew your certificate before it expires. A daily cronjob should be fine for this one.
Setting up a letsencrypt renew Cronjob in Ubuntu
If its your first time to create the cronjob, it will ask you to choose your text editor – it’s easier to use nano.
Simply type crontab -e, then scroll further at the bottom.
Then copy/paste this:
0 0 * * * /usr/bin/letsencrypt renew >> /var/log/letsencrypt/renew.log
Save the file and exit.
The cronjob we set above will execute at midnight (time zone of your server) on a daily basis.
To check logs:
cat /var/log/letsencrypt/renew.log
Permanent Redirect From HTTP to HTTPS
To fully take advantage of the free SSL, we need redirect all our users from non-secure to secure url of our osTicket instance.
Doing so will require you to create a new .htaccess file inside of /var/www/html. Take note, this will only work with the VPS we created using DigitalOcean.
To start off, login to your VPS as root. Then do the following commands:
nano /var/www/html/.htaccessCopy and paste this:RewriteEngine on
RewriteCond %{HTTPS} off
RewriteCond %{HTTP_HOST} ^(?:www\.)?(.*)$ [NC]
RewriteRule (.*) https://%1%{REQUEST_URI} [L,R=301]
Save the file by pressing
ctrl + othen ENTER key when asked to save the.htaccessfile name.Exit the text editor –
ctrl + x.a2enmod rewrite– if it saysModule rewrite already enabledthen stop right there. You have no more to configure. Else, do this,service apache2 restart.Then test your URL by typing just the URL. In my case I only typed
support.chubbable.comand it should redirect me tohttps://support.chubbable.com.
Note: This would not work in general – it will only work if you follow along this guide from start up to this point.
Answers to Common Issues
MySQLi extension for PHP — missing!
Make sure you install and enabled the php5.6 module.
The command to install and enable the module:
- Install the module –
apt-get install php5.6-mysql - Enable the module –
phpenmod php5.6-mysql
- Install the module –
500 Internal Server Error
Make sure you are using the right version of PHP (
php5.6). At the time of writing this post,php7.0is NOT yet supported by osTicket v1.10.If you got a VPS with
php7.0running on it, you need to purge it first then installphp5.6.Actually, v5.6 and v7.0 could co-exist. But to make things simple for this osTicket-specific guide, the purge/remove method would be a thumbs up.
I’ve already purged
php7.0but shows up again when doingphp -v?This is fine for as long as php 5.6 is the one enabled or active when checking your PHP info. If you want to get rid of this, you can do the following:
apt-get purge php7.0-common -y– if you see PHP 7.0 or 7.0.xapt-get purge php7.1-common -y– if you see PHP 7.1 or 7.1.x
Then do a
php -vcommand to check your PHP version. It should now show asPHP 5.6.x
It’s a Wrap!
Wrapping up.
You should now be a proud owner of a secure VPS loaded with the free help desk software called osTicket.
Installing osTicket on a Linux-based VPS isn’t really that hard. With the help of my step by step guide, you could build your own help desk support system.
If you want to use a VPS host other than DigitalOcean, then you need to setup the firewall yourself, along with other security measures mentioned in this post. You also need to install and configure Letsencrypt SSL if you want to take advantage of the Free SSL benefit.
In case there are part or section of this tutorial that you don’t get or follow (probably because I failed to explain it well or missed to tell something), you can use the comment section below and ask me. I will try my best to respond when I have the time.
If this guide worked for you… you could say Thank You – by sharing or linking to this post. That, will motivate me to continue writing tuts like this one.
CentOS or Debian User? Install guide will be posted around January 2017.