Learn how you could obtain a static IP address for your devices without manually entering it from network configuration. Let your Network Router do the job for you, but first you need to do something from your end. So you need to configure your Wired or WiFi Router first so it will assign the same static IP address to your devices, even after reboot.
The usual way of getting or obtaining a static IP address for your devices within your local home network, is by setting it from the Network Configuration menu and then manually entering the IP address.
But since home network Routers are more advance now, we can easily setup our routers and obtain a static IP addresses automatically.
Jump Links
Purpose of setting a static IP address
There are few reasons why you would configure your devices to obtain or have a static IP address. One common purpose of this is, port forwarding or packet forwarding.
To set a proper port forwarding setup on your network Router, you need to have a static and steady IP address that doesn’t change even after your reboot. A packet forwarding rule is effective for a specific IP address only, and when any of your network node or devices have changed it’s IP address, then your configured rule should now be invalid.
Other reasons why you need a static IP addresses
In order for the following process, task or activity, they need to have a static IP address to function properly.
Traffic shaping & Bandwidth Priority
Traffic shaping and bandwidth management requires a device to have a static IP address, because it uses that particular IP address to implement a rule or sets of rule.
Parental Control & Access Control
Parental Control and Access Control feature also requires a target device to have a static IP address so the rule would know which node on the network needs access restriction. This feature needs the IP address details not the host name.
Server Applications
Server applications like Web server or File server needs to have a static IP address, so other network services and client machines would know where to look at. So if you plan to have a file server at home, you have to assign it a static IP address so clients on your LAN could map that IP address to a name. For instance, you could map
192.168.0.1to a name likeFile Server 1.
Procedures
In this guide, I will teach you how to set your home network Routers to assign a Static IP Address based on MAC Address.
What is MAC Address?
MAC Address or Media Access Control, is assigned to a network interface like your network card and WiFi card. It is unique to every devices and does not have a match with others.
MAC Address format looks like this…
A1-B2-C3-D4-E5-F6
OR
A1:B2:C3:D4:E5:F6
Without explaining further, they are called Hexadecimals.
Moving forward, below are the steps on how you would configure your Routers to issue a static IP address to each network device or node within your loca area network.
I will discuss how you would do it on a DD-WRT router, pfSense, TP-Link Routers and Aztech DSL5001EN modem/router.
Those are the current Routers and Router software that I’m using.
Configure DD-WRT To Assign Static IP Address
These steps are specific to DD-WRT flashed Wired/WiFi routers. In my case, I have a Linksys WRT54G2 flashed with DD-WRT v24-sp2 (10/10/09) micro
Follow these very simple steps.
Step 1: Get to know your device MAC Address.
For Windows based Desktop PC, go to start menu then > RUN command, type in cmd and hit enter key, a black screen should pop-up.
Next, type in ipconfig /all and hit enter key. Output text should be printed on your screen. Now look for your Network Controller. Usually this is your on-board network controller.
Look for the line:
Ethernet adapter Local Area Connection:
Then look for your on-board network adapter under Description.
Then below it… You should see a label and text entry (Sample text only):
Physical Address..................: 0a-0b-0c-0d-0e-0f
Take note of that, that’s your MAC Address.
Step 2: Take note of your Host Name
A host name is is your machine name.
IN Windows, it’s your Computer Name found under Control Panel > System > Computer Name tab.
IN Ubuntu or Linux Mint, type hostname from your terminal and you should know your host name.
IN Android, Go to Settings > About Phone > Status > WiFi MAC Address
Step 3: Login to your DD-WRT Router and enable Static Lease
Once logged in, go to Services from the main menu then > Services.
Browse a little farther to the bottom, and you should see Static Leases block. This is where you should configure your static IP address based on your MAC Address.
From this page, you will lock your device MAC Address to your desired static IP address.

Static IP Lease Page
Step 4: Add your MAC address
While still on the page, click the ADD button, a new set of text fields should appear just below the Static Lease label. If you need more for your devices, just click the button again.
Those fields are:
- MAC address – Your device MAC Address
- Hostname – Your device host name or device name
- IP address – Your desired IP address
Now enter the necessary details accordingly, and click Apply Settings button to let your settings takes effect. If it doesn’t, reboot your Network Router and disable and re-enable your network controller.
Just repeat this step for your other devices or hosts and that’s it.
Static IP Address via DHCP in pfSense
In pfSense, Static IP Lease as it’s called in DD-WRT, is differently called and labeled under pfSense. It’s called… DHCP Static Mappings.
Though it’s called differently, it will do the same thing with DD-WRT. That is… it maps a MAC Address to a specific IP address.
Let’s get started with the easy steps.
Step 1: Take note of your device MAC address and Host name.
I’ve already discuss about this step and that step.
Step 2: Login to pfSense Admin page and enable DHCP Static Mapping
Fire up your browser and navigate to your pfSense IP address, login with your user name and password.
From the main menu, navigate to Services then > DHCP Server > scroll further down below until you see the DHCP Static Mappings block.
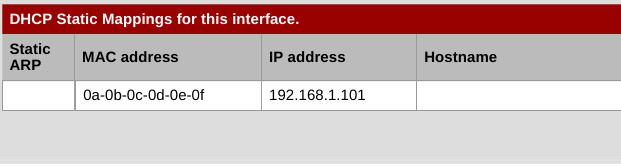
Static IP Mapping
From the far right side of the block, you’ll see a plus (+) button, click on that one and a new page should open.
This is where you need to enter your device details.
The most important field you need to fill are:
- MAC address – Enter your MAC Address with colons (
:) - IP Address – Your device IP Address
- Description – Like, Xbox, PS4, Android, DVR or something descriptive
Step 4: Enter all device details, save and reboot
Enter all your device details here, click on Save button found on the bottom of the page when everything’s set up. You may also need to reboot the box.
That’s it!
Static IP Address assignment in TP-Link Routers
When it comes to TP-Link routers, they have labeled their static IP address mapping or static IP lease with Address Reservation. That’s how they labeled it.
Here are the steps to configure it, particularly with Model No. TL-WR720N. But other models are similar.
Step 1: Take note of your device MAC address and Host name.
I’ve already discuss about this step and that step.
Step 2: Login to your Network Router and enable the Address Reservation feature
After logging in…
From the left navigation menu, navigate to Address Reservation under Advance Settings > DHCP.
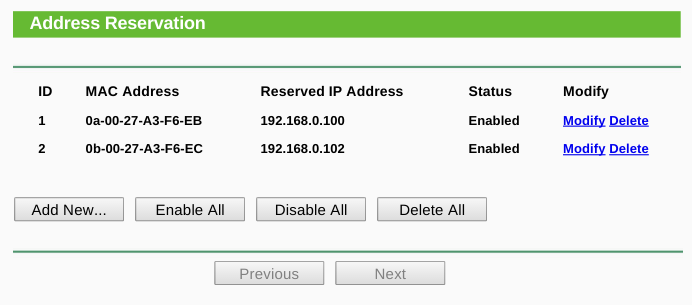
Screenshot of Static IP Address Reservation
When already on the page, click Add new button. You have to fill MAC Address (with dashes -), Reserved IP Address and Enable the status. Click Save when done.
You need to reboot your Router for the settings to take effect. So enter all your device details in case you’re configuring it with multiple devices, then do a reboot.
That’s it!
Static IP Address Reservation in Aztech DSL5001En
If you have this Modem+Router issued by Globe Broadband (a Philippine ISP), static IP lease is labeled as MAC/IP Address Reservation
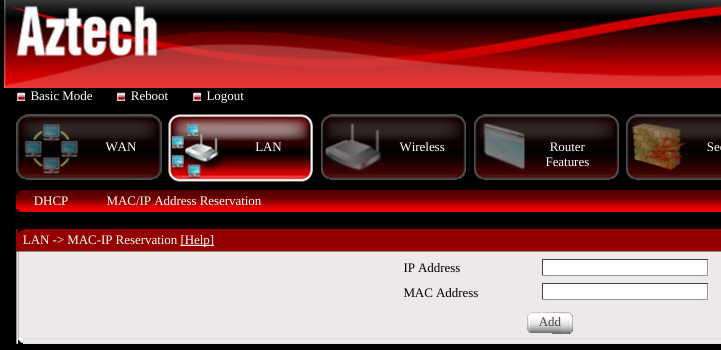
Screenshot of Static IP Address Reservation in Aztech
To set this on Aztech DSL5001EN model, you need to login as Admin. The last known Admin user details that worked is below.
- User Name –
admin - Password –
3UJUh2VemEfUtesEchEC2d2e
So lets’ get started with this part.
Step 1: Take note of your device MAC address and Host name.
Instruction was mentioned in this step and that step.
Step 2: Login as Admin
Fire up your favorite browser and point to 192.168.254.254. If you’re from other country, this detail may be different. So you need to search on this.
Step 3: Configure IP Address Reservation
When already logged in, click on Advance Mode under the Aztech logo.
Then navigate to LAN then > MAC/IP Address Reservation. Now, just enter your device MAC Address and your desired IP Address. Click on Add button, and repeat for other devices.
NOTE: Enter your MAC Address with colon
:
Step 4: Reboot
Click on the Reboot button, under the Aztech logo. And that’s it!
It’s a Wrap!
So that’s how you configure a static IP address reservation from various Router models. If you have other models and you know how to configure it, you may share it with me and I’ll be glad to add it to my post.
You could use this guide for other router brands as well, steps are similar anyway. You must only need to take note of your device MAC and IP address.
This has been my guide on How to get a static IP address from router.
Feel free to post any comment below. Thanks for reading.