Another step-by-step guide on how you would control and limit the bandwidth for client devices connected to your home network. This guide will show you how you should do it on a TP-Link TL-WR720N Router. It’s a Router that I’m using issued by Globe Broadband, an ISP from the Philippines.
Purpose
This guide may work for you if you wanted to limit or control the speed of your WiFi or Wired connection, specifically for a number of client devices or users within your local area network.
So if you have an TP-Link TL-WR720N Router issued by Globe Broadband, then this guide should work for you.
This guide will be useful for a shared internet connection scenario, where single Globe Broadband Internet is shared to several WiFi capable client devices like Android Phones, Tablets, iPad and Wired devices like Desktop Computers.
Furthermore, with the help of this guide, you could throttle down the WiFi or Wired speed of Torrent downloading, video streaming and other big file downloads for a specific device or IP addresses only.
Limiting The Bandwidth
Before you start with this guide, make sure you know the Administration Username and Password for you device. But in case you don’t know, I’ve provided the details for you. See details below.
TP-Link TL-WR720N Router Admin Login Details:
- Username –
admin - Password –
admin - Login Address –
192.168.0.1
In case the above details doesn’t work for you, then search around. Ask my friend Google.
Procedures
Before you proceed with the initial step, make sure that you’re WiFi or Wired Network is working as it should. Use a wired connection for this step and use a static IP address instead of DHCP acquired dynamic IP.
Below is the initial step to limit your WiFI or Wired Internet speed.
Step 1: Login as Admin
Fire up your favorite browser and browse to 192.168.0.1. A login box should pop-up on your screen.
Log in using the details mentioned above. Once Logged in, click on the IP QoS from the left navigation menu, under –Advance Settings–.
Step 2: Enable and configure IP QoS
On this page, you can see the following columns and label.
- Bandwidth Type
- Bandwidth Apply
- ID
- IP Range
- Mode
- Bandwidth
- Description
Those are the fields you need to configure to throttle or control the speed or bandwidth of your home internet for various devices and clients within your home network.
To continue…
Tick the check box labeled Enable IP QoS to activate it.
Step 3: Choose Bandwidth Type and Bandwidth (in Kbps)
Depending on your subscribed plan, you should choose between aDSL or Others from the drop-down menu. You could just choose Others and then input your applicable Internet speed.
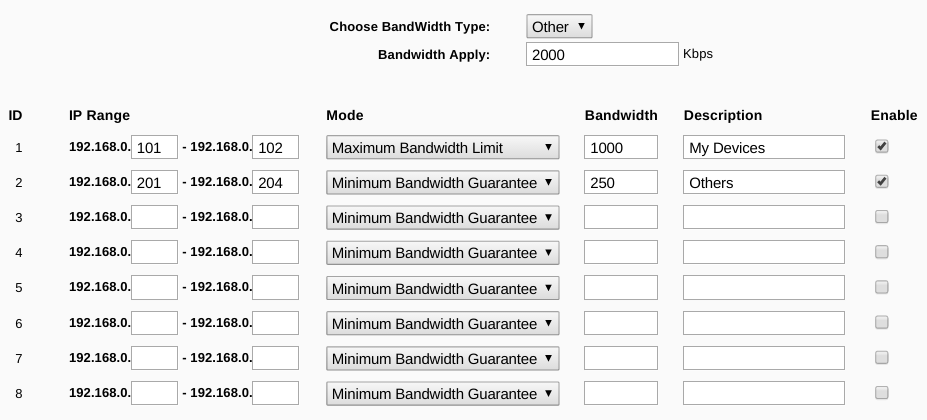
If you’re on a 2 Mbps plan (2048 Kbps), you could enter 2000 Kbps.

IPQoS Settings Page
Step 4: Enter an IP Range
This details covers the IP range which should be affected by the bandwidth limit settings. Any devices or clients that has an IP address covered in this settings, should be throttled.
In my case, I want all IP addresses from 192.168.0.201 to 192.168.0.254 to be covered by the setting. Family members and house guest should be getting those IP’s dynamically when they connect to my TP-Link TL-WR720N Router.
You could choose whatever you want. But since you’re the Admin of your Router, I’m pretty sure that you don’t want to be affected by your own settings. And that you don’t want any of your devices gets affected by this settings. In this case, you should set your client devices to have a Static IP Address, which is not covered by the IP address range you set.
In my case, I’ve set my Desktop computer and Android phone to have a Static IP address. For the sake of demo, I’ve set it like the following:
- Desktop ->
192.168.0.101 - Phone ->
192.168.0.102
As you can see, the IP address I chose is not covered from the IP range I set above. This means that, my devices shouldn’t be affected by the bandwidth limit.
Step 5: Set The Speed Mode and Speed
This setting offers you to choose between two modes, which are;
- Minimum Bandwidth Guarantee
- Maximum Bandwidth Limit
Minimum Bandwidth Guarantee – This mode should work to control bandwidth, but does not limit or does not impose a maximum speed. So any client should be able to use whatever speed is available. But this settings should always provide the minimum speed you configured it to provide. Meaning, this should be the lowest speed you want to provide to clients. Make sure that you properly divide the speed (in Kbps) among the clients within your home network.
Maximum Bandwidth Limit – This mode let’s you choose to provide the maximum speed limit each client could have. So if you set this to.. say for instance, 128 Kbps (just enough to browse Facebook and make a Google search), all clients should have a maximum speed of 128 Kbps. This does not mean though, that each client will have this speed. It depends on the available bandwidth of your whole Internet bandwidth. So make sure you divide this properly, considering the total numbers of clients within your home network.
In my case, I need to create two rules here. One for my devices and one for housemates and guests. Since I’m the admin and owner of the Internet plan, I should be getting more bandwidth.
So I will set two sets of rules and two IP ranges.
NOTE: I’ve set MAC address reservation to get a static IP address via DHCP. See guide here.
For my Desktop and Phone, I will set the IP range from 192.168.0.101 to 102. IN your case, you should use the available ID’s that you have.
For my case, I will be using the first ID (ID 1) since it is my first rule.
Next, I set Mode to use Maximum Bandwidth Limit and I set 1000 Kbps under Bandwidth field. With this, I should be getting a maximum speed of 1000 Kbps, whenever an application needs it. So if I watch a Dubstep or Glitch Hop video from YouTube, I should get a speed limit of 1000 Kbps.
Next, I’ll set a rule for my 3 housemates and a guest. I’ll equally divide the rest of my bandwidth (1000 Kbps) between 4 clients. So I need to create another rule by filling up ID no. 2.
I set IP range from 192.168.0.201 to 204, Mode is set to Minimum Bandwidth Guarantee, while Bandwidth is set to 250 Kbps. This configuration sets each client to have at least 250 Kbps of bandwidth. Noticed that I divided the 1000 Kbps to 4 clients, that is why I set it to 250 Kbps. This means that each client should have at least 250 Kbps speed, but if there is still available bandwidth, and that the client requires more bandwidth… it makes use of the available bandwidth while not recognizing maximum.
NOTE: You should configure your DHCP settings settings for this.
Step 6: Set Rule Description
Fill up the Description field so you’ll have a clue about the rule set when you revisit this page or when you want to reconfigure it after a long time.
Step 7: Enable each rule and save
Enable each rule by ticking the Enable button and finally clicking Save button located at the bottom of the page.
IPQoS Settings Page – Screen 2
Static IP Address Via DHCP
In my case, I should configure my Desktop and Phone to have a static IP address that is tied to my device’s MAC address. Media Access Control or MAC is an identifier for your network device. Use this detail to get a static IP address even using a DHCP settings to get a dynamic address.
I should configure this from the Router so I get the same IP address even after Router reboot or my device reboots. Remember that I configured my IP address to have a maximum bandwidth limit of 1000 Kbps. If other client on your network suddenly gets this IP address, then s/he would be getting 1000 Kbps maximum of bandwidth limit.
So you need to lock the IP address to your MAC address.
Procedures For TL-WR720N
Step 1: Go to Address Reservation page
To do this, go to DHCP > Address Reservation, which is under the –Advance. Settings–

IP Address Reservation
Step 2: Create a new rule
Cick the Add New button to create a new rule. Then enter you device’s MAC Address with dashes.
Enter your IP address, this IP address is the IP that you’ve configured to have a bandwidth limit.
Set Status to Enabled and click save. Just repeat this for other devices. You need to reboot the Router for the configurations to take effect.
NOTE: To check your MAC Address in your Android Devices, go to Settings > About Phone > Status > WiFi MAC Address.
That’s it!
It’s a Wrap
That’s how To Limit WiFi Speed on TP-Link TL-WR720N Router for network devices within your local network. It should also work for your Wired devices.
If this guide worked for you, you may say thank you by posting your comments below. If you need further help or clarifications, please feel free to ask it below.
Enjoy your TP-Link TL-WR720N Router.
Also checkout my guide on How to setup Quality of Service in DD-WRT flashed Routers.