In this step-by-step guide, I will show how you would install osTicket (the free help desk software) locally, under Windows using a portable Web Server called USBWebserver. In case you didn’t know yet, osTicket is a free and open source helpdesk software and help ticketing system, similar (but not entirely the same) to platforms like; Zendesk, Freshdesk, Groove and Ladesk. Installing it under Windows should be easy and quick, but NOT that easy under Ubuntu 16.04. In this post, both Windows and Ubuntu local install are covered.
Jump Links
- System Requirements
- How to install on Windows (WAMP)
- How to install on Ubuntu 16.04 (LAMP)
- How to install on Windows 7, 8, 10 using XAMPP
- How to install osTicket on Ubuntu 16.04 VPS
Overview
OS Ticket, stylized as osTicket, is known in the open source community as free helpdesk and support ticket system. It is considered as flexible, and one of the most reliable and hassle-free help ticket systems available on the Internet. Take note, though this software is free, it comes packed with features and tools like what’s available on commercial helpdesk software out there on the Internet.
You can use this help desk software on-premise or cloud-hosted by Enhancesoft’s own hosting environment, which requires you to signup for a paid account. On-premise could also mean, you self-host it using your own server within your intranet. You could also host it yourself using Digital Ocean or Amazon AWS.
osTicket is developed by Enhancesoft, a fast-growing, profitable, software-product development company based in Alexandria, Louisiana. It has been downloaded over 1.4 million times, and has users in over 200 countries.
At the time of writing this post, this helpdesk software has the latest and stable version of v1.9.14, with the following release highlights;
Note: When I mention OST in any part of this post, I mean osTicket.
Enhancements
- Update user information for existing users when importing CSV
- Agent names are consistently formatted and sorted throughout the system
- Memcache session backend support. (See include/ost-sampleconfig.php)
- Email domain validation includes DNS record verification
- Make ticket queue selection sticky
Improvements
- Fix incorrect mapping of ISO charsets to ISO-8859-1
- Fix unnecessary drop of ticket CDATA table because of update to deleted field
- Fix inability to create or update organization custom data
- Fix inability to update some fields of user custom data
- Fix filtering user custom data for email tickets
- Fix missing email headers resulting in incorrectly threaded emails when delivered
- Cleanup file data when removing custom file uploads
- Fix crash when exporting PDF and PHAR extension is not enabled
- Fix crash processing some TNEF documents
- Fix handling of GBK charset when gb2312 is advertised
- Fix link to client ticket listing when logged in
- Disambiguate staff and collaborators when processing a some emails
- Fix several i18n phrase and layout issues
- Improve detection of some bounce notices with alternative content
- Fix image URL rewrite when pasting existing images, from a KB article for instance
- Preserve internal note formatting on new ticket by staff if HTML is disabled
- Touch organization updated timestamp on custom data update
- Fix deployment on Windows® platforms
- Fix upgrade crash if retrying an old, failed upgrade from v1.6
- Fix corruption of some html content
System Requirements
osTicket has a small footprint, any modern web server setup will work. To install and run it, as of version 1.9.8, the following components are required;
- Web Server: Apache 2.4 or later
- PHP 5.6 (v7.0 is not supported yet – as October 2016)
- MySQL 5 (or later)
- A minimum server RAM of 1024 MB
Procedures – Windows Based
Installing osTicket on Windows-based web server (WAMP) will require you to download a portable web server stack called USBWebserver. You can use Windows XP, 7,8,10 with this stack. You may use other Windows-based stack if you want, like XAMPP for Windows. But for this guide, USBWebserver shall be specifically used.
NOTE: You should only use this for testing environment, and NOT for production or live environment. The reason why you might wanna use this, is to test OST without time limit. OST demo from their official page is offered only for 14-days, which is kinda limited for those who wants to test the system thoroughly.
Step 1: Download, run and configure USBWebserver Software
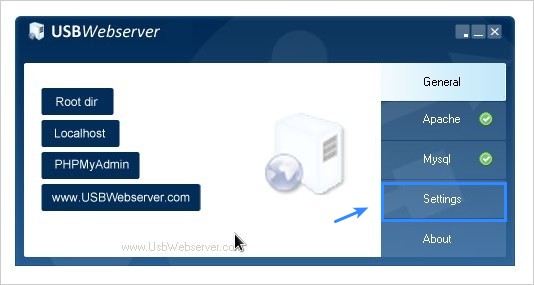
Once downloaded, extract and run the software. At first run, you should be able to see this screen.
Reference Image:

Screenshot – Installing osTicket locally on Windows using a portable Web Server
Go to settings, then change
Port Apachefrom8080to80– if there is no other web server running on your Windows machine. If there is, then leave the port to8080. Click Save buttonGo to
Root Dirand change{root}/whatever-is-on-hereto{root}/osticket. Click Save button and close the window.
Step 2: Create a folder called
osticketinside the folderUSBWebserver 8.xStep 3: Extract
osTicket-v1.9.14.zipor whatever version you have downloaded.Copy all the files inside the
uploadfolder and paste it intoosticketfolder – insideUSBWebserver 8.xfolder.Then go inside
includefolder and copy/duplicate the fileost-sampleconfig.phpin the same folder and rename the file toost-config.php.TIP: In Windows, you can duplicate a file (prefixed with copy) in the same directory, by dragging the file while holding down
ctrlkey and dropping it on any part of the whitespace.Step 4: Fire up
usbwebserver.exeagain and make sure Apache and MySQL are both lighted green. An indication that both have NO issues. If lighted red, then there are issues. One issue that might have caused it is, you didn’t completed step 2 above.In case you missed to create the folder, which is supposedly completed under step 2, then do that now and start Apache by going to the Apache tab and manually start it – clicking the start button.
Step 5: Start your favorite browser, in this case I will be using Chrome.
Type in
localhostand press enter key, and you should see a screen exactly looking like this:Reference Image:

Screenshot – osTicket Installation Wizard Page
Notice the screen-shot above, all Required and Recommended components were checked and colored green. Indications that it’s all good to go, but before hitting the Continue button, let us first create a Database for it, so follow next step below.
Step 6: Create a Database and Database User.
While your browser is still running, create a new tab and type in
localhost/phpmyadmin– that should take you to phpMyAdmin login page. Login usingrootas username whileusbwis the password. Once logged in, create the necessary database details.In this case, I will use;
osticketfor both database user and database name.Video Demo Here:
https://youtu.be/jVHuEElZbUYStep 7: Run the installation wizard.
Load a new browser tab or window and navigate to
localhost– the wizard should automatically load up the following screen.Reference Image:
Screenshot – Installation Wizard Page for osTicket
You should see that all Required and Recommended components are checked and good to go, so click on Continue button to start the wizard. You should be taken to the
osTicket Basic Installationpage.If not, and you see the screen below instead, then make sure you completed the step mentioned in Step 3. That is, duplicating the file
ost-sampleconfig.phpand renaming it toost-config.php.Reference Image:

Screenshot – Config file missing
Step 8: Basic Installation – fill out the important fields.
You can enter any value you would want, under the System Settings and Admin User field sets, while taking note of your Admin Password.
Fill out Database Settings and use the details we used under Step 6, in this case,
osticketis the database name and database username.Sample:
- MySQL Database:
osticket - MySQL Username:
osticket - MySQL Password:
your-own-password
Note: Email address under System Settings, should be different from Admin User’s Email address.
Once done, click Continue button, and you should be taken to the Congratulations! page. On this page, osTicket requires you to do some post-install setup. But in this specific case, we don’t need to run through the Config file permission setup, since we are running the help desk software on a Windows-based web server. With Linux or *nix based servers, we need to go through these additional steps.
Reference Image:

So there you have it, that’s how you would install os ticket on Windows, using a ready-to-use and portable Web Server. Take note, that you can run osTicket from any computer you wish, just plugin your USB with the web server files in it. Fire up the
usbwebserver.exeand voila!- MySQL Database:


Pages: