Jump Links
- System Requirements
- How to install on Windows (WAMP)
- How to install on Ubuntu 16.04 (LAMP)
- How to install on Windows 7, 8, 10 using XAMPP
XAMPP: Alternative Way of Installing osTicket on Windows
Here’s another step-by-step guide on how you would setup an instance of osTicket on Windows 7, 8 and 10. You will need another WAMP stack called XAMPP, a software project maintained by Apache Friends. It’s an open source software that makes developer’s life easier, by providing them an easy to install Apache distribution containing MariaDB/MySQL, PHP, and Perl. Not only that, it also help newbies like us, to setup a web server in Windows, the quickest and easiest way. How so? Because setting up a web server is just two step away; download XAMPP and install XAMPP and voila! You have a WAMP server!
On the other hand, there is also a Windows-based WAMP stack I mentioned, and that is USBWebserver. It’s a portable web server that you can take and run anywhere you want. Read how I setup OST with this stack by clicking here.
To install osTicket using XAMPP, first you need to download the latest version of XAMPP and make sure you choose the stack that supports PHP v5.6.x and below. Why? Because OST doesn’t support PHP v7.0 yet, as of October 25, 2016 (v1.9.14).
Reference Image:
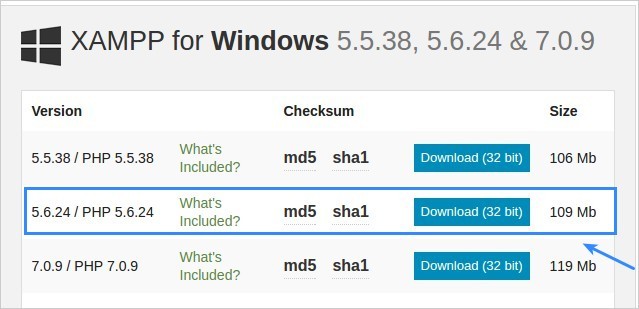
Screenshot – XAMPP Download Page
Okay, enough with the talk, let’s start off with this tutorial.
NOTE: A quick video guide is available from this YouTube Link
Procedure
Step 1: After downloading XAMPP, locate the file and install it.
In my case the file name is;
xampp-win32-5.6.24-1-VC11-installer.exe. This step is very straight forward.Step 2: Extract OST installer files and copy to
htdocsfolder.Extract the zip file, and go to
uploadfolder. And then duplicate the file namedost-sampleconfig.phpand rename the copy asost-config.php.Then create a new folder inside
htdocsfolder, and name it whatever you would want. In my case, I named itosticket. Thehtdocsfolder is usually inside thexamppfolder inc:drive. You can also access this folder through XAMPP’s Control Panel by clicking on theExplorermenu.Reference Image:

Screenshot – XAMPP Control Panel on Windows
After that, copy all the files and folder inside the
uploadfolder and then paste insideosticketfolder.Step 3: Launch XAMPP Control Panel & Start Apache and MySQL.
You should’ve launched the control panel after you installed XAMPP. In case you have closed down the control panel, launch it again and click on each
Startbutton that corresponds to Apache and MySQL.Step 4: Create a Database and Database User.
Launch
phpMyAdminand create a user with the same name as the database name. You can easily do this from the phpMyAdmin Web GUI.Using your browser, navigate to
localhost/phpmyadmin, no login required.Then navigate to
User Accountsmenu thenAdd user accounts. On this page you need to fill out; User name, Host name, Password, the most important of all –Create database with same name ang grant all privileges, checkGrant all privileges,Global privileges– checked all, and finally click GO button on the bottom-right corner of the page.Step 5: Open a browser and start the osTicket setup wizard.
Fire up your favorite browser and navigate to
localhost/osticket– orlocalhost/your-folder-name. The install wizard should load up, showing pre-requisties and recommended extensions. All should have a checked mark. In casePHP IMAP extensionis marked with red X, then you should first enable the extension and then go back to this page.To enable PHP IMAP extension in XAMPP – you can simply click the
configbutton for Apache, using the control panel. That should open your text editor likenotepad.exe. Then hitctrl + fto search for the stringimap. You should see the line;extension=php_imap.dll. Comment out this line by removing;in front ofextension, and save the file.Reference Image:

Go back to XAMPP control panel, and stop and start Apache to let the config take effect. After that, go back to your browser and reload
localhost/osticket– expected result;PHP IMAP extensionshould now have a green check mark.Next, go back to the Basic Installation Page and continue filling out the important fields; Database and Admin Credentials.
After that, you are ready to install the software.
Hit Install Now button.
Step 6: Login and configure.
After seeing the Congratulations! page, you can now navigate to the frontend and backend of OST and configure it further. You can now make tests and experiment with the settings without limits.
Step 7: Installed!
Now that osTicket was installed using XAMPP, you can play around and explore the settings. Take note again that this environment is for Demo and Testing purpose only.


It’s a Wrap!
There you have it! By now, you should already have an instance of osTicket that you can test all the way without limits. You can explore and test all the features locally. Test it as an Agent or Admin without limits. After all, it’s a free help desk software and open source.
Once you decide to use and wanted to set it up on a production environment, say like VPS or dedicated server, you just need to sign-up for the hosted account provided by Enhancesoft Team.
Or if you want to setup your own instance and have the courage of setting it up on a live environment, then consider Amazon or Digital Ocean as your Cloud Server Host. Their service is newbie friendly and their support is top notch.
Installing osTicket locally is not that hard, with this step-by-step howto guide, you can quickly set up an instance on any of your local servers or machine.
Pages: