Hello media server lovers and HTPC enthusiast! I’m back for another Ubuntu-based guide on how to set things in your Linux-based HTPC or media Server. For this guide, I’m going to show you the step-by-step procedure on how to setup a media server with DLNA/UPnP support, using two free-download-able software.
For the DLNA and UPnP part, I’ll be using Plex Media Server to serve media files to various DLNA/UPnP capable clients. While for the HD media playback, I’ll be using XBMC as the front-end application.
Introduction
Some of you might ask why combine Plex with XBMC? Well, the main reason for this is, XBMC (v13.1 Gotham & previous versions) is not capable of transcoding media files. Meaning,it serves and play files “as is”.
Note: Transcoding is a process where you use a computer and computer application to convert one media format to another format. Like, MPEG-4 to H.264 format conversion.
Though XBMC is capable of playing back almost all sorts of audio and video formats around, it’s not capable of converting media files, for proper play-back to DLNA or UPnP capable devices (like, PS3, SmartTV, Tablets and SmartPhones). This means that, XBMC can only act as a media player and media source for supported DLNA/UPnP capable client devices. And that, these client devices can only playback a file that it natively supports. So it couldn’t play a file from XBMC’s media library if that particular file is not supported under a particular device. While XMBC can handle almost all known media formats around, not all DLNA clients and UPnP devices could handle all the known media formats that are currently being used today.
Smart-Phones, Smart-TV and Stream Boxes are limited to to their hardware’s media decoding capability. So you have to re-encode your existing video files to match with your device’s supported format. Like for instance, you have a video collection that are encoded with H.264 MP4 format, and your SmartTV can only playback a file encoded with MPEG-AVC format. So what you do first is to re-encode your H.264 video to MPEG-AVC video format so your TV can play it back without issues. So in this example, you need to store 2 video formats for one movie title in your XBMC movie library. And this in my opinion is not so practical if you have more than one DLNA/UPnP capable devices. Because you need to convert each movie title to each video format that your device could able to playback.
And what if you have thousands of HD video files and you want to stream those files to a 3GP-only capable SmartPhone or to your old PC that can’t handle at least a 720p HD movie? The seemingly answer to this is would be, convert all your videos to match each format (avi for pc, 3gp for cellphone or mp4 for PSP), that your device could handle — which is so impractical. Though I said it’s impractical, I’ve done this before when I was still starting with XBMC and Linux Servers.
I wasn’t using on-the-fly transcoding at that time. Take a look at the image below, that’s how I organized my files, 1 movie title with 3 video formats.

With the use of software with encoding and transcoding feature we could avoid those things I’ve mentioned above. You don’t have to transcode or encode each video files, prior to streaming or playing it back to DLNA and UPnP capable devices. If your hardware is powerful enough to encode/transcode a video on-the-fly, then that would be great because you don’t have to re-encode your files anymore just to play it back properly in your phones or whatever device you might have. So in this guide, I’m going to show the step-by-step procedure to enable transcoding/encoding capability in your HTPC, Media Server, or Linux Server, using XBMC and Plex Software. Please read the requirements below before starting with this guide.
Purpose of This Guide
The main purpose of this guide is to help you install Plex and XBMC and set it up in your Linux-based HTPC or Media Server. We’ll configure Plex so it could perform on-the-fly transcoding, eliminating the need of prior encoding or transcoding of video files before streaming to a DLNA/UPnP capable devices. We’ll use XBMC as our HTPC front-end application while Plex shall be setup to take care of the DLNA and UPnP services, and shall serve as media source or media server for XBMC’s media library and other media devices. XBMC has a DLNA feature already built-in with it, but we’re not going to use that since it is not capable of transcoding. Plex is the best tool for this setup, because we can set it to serve and transcode files on-the-fly while streaming to various media devices.
Requirements For Ubuntu-based HTPC
Since your server will be running both XBMC and Plex media server on the same machine, it’s recommended to follow the below system requirements for your build. But to have an idea about each software’s system requirements,
check this link for XBMC’s minimum system requirements and this link for Plex’ minimum system requirements.
Minimum System Requirements – with transcoding support:
- At least a Dual-core Processor 2.4 GHz
- For multiple transcoding, for multiple devices, a faster CPU may be required
- 2GB Memory, at least
- GPU (Radeоn HD 5400 Series or newer, Intel GMA X4500HD or newer, Nvidia GeForce 8-Series or newer) to support hardware-based decoding.
- 30GB Hard Drive (at least) for system drive
- Ubuntu 14.04 Server 64-bit
- XBMC and Plex Software Package Installers
Part 1: Ubuntu Server 14.04 Installation
This would be the first part of the step-by-step procedures of this guide, you may skip this step if you already had installed Ubuntu.
But if not, then follow this guide on how to setup a headless Ubuntu Server. The guide will teach you how to install the server edition of Ubuntu.
Part 2: Plex Media Server Software Installation
I’ve already posted a guide for this. Just follow the guide on
How To Install Plex Media Server in Ubuntu, and get back to this page to continue with Part 3. But if you got it installed already, then proceed to Part 3 and follow the XBMC procedures.
Part 3: XBMC Installation
For this part, you need to prepare yourTerminal app if you’re on Linux or Putty.exe if you’re on Windows.
Double check your network and your target machine, make sure it is connected to your network. Take note of it’s IP address. To install XBMC in Ubuntu Server Edition, you need to add it’s PPA repository first to Ubuntu’s source list. Then we need to install a light-weight window manager for Ubuntu so we can start XBMC’s front end interface. Be reminded that we’re installing XBMC on a GUI-less Ubuntu, so you got no icons to click on and no mouse pointer to click with. We do all the installation commands using the command-line. But you may just copy-and-paste the commands from this guide and substitute the values that could be applicable with your case. This is a two-part installation guide, first part is XBMC guide and the second is the Linux window manager installation. So let’s start.
Part 3-A: XBMC Setup
Step 1: Launch a terminal if you’re on Linux or Putty.exe if you’re on Windows.
Let’s access our target machine and login using
SSH.In my case, I’m logging in from my Linux Mint machine.
Type the following in your command-line:
Reference Image:

Change
chubbablewith your own username and the IP address with your machine’s IP address.Step 2: Install XBMC’s dependencies, type the following and press enter.
sudo apt-get install python-software-properties pkg-config \ software-properties-common xinit -yYou can copy the whole texts and paste it to your command-line.
Reference Image:
Step 3: Let’s add XBMC’s official PPA by typing the following and press enter.
sudo add-apt-repository ppa:team-xbmc/ppaPress
Enteragain when asked.Reference Image:
Step 4: Update the sources list to pull down fresh data, and that includes XBMC’s package information.
Type the below command and hit enter.
This will update packages and will install XBMC in one command.
sudo apt-get update && sudo apt-get install xbmc-standalone -yThis will take around 10 minutes or below to complete the installation.
After the installation, you can’t launch it’s interface yet.
We still need to create a user to run XBMC session.
Step 5: To enable XBMC to start automatically on boot, we need to allow X to start from non-consoles.
So we need to configure it to allow from anyone or anybody.
Type the following commands and hit enter.
sudo dpkg-reconfigure x11-commonA new window should pop-up, select
Anybody(down key) and hit ok button (press tab + enter).Reference Image:
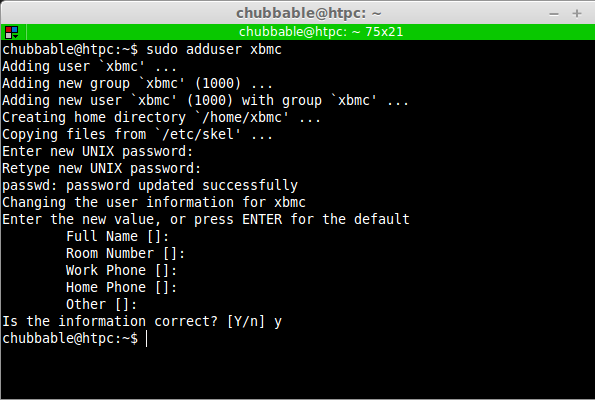
Step 6: Create a new User to run XBMC’s session. Enter the following command, to add
xbmcto the lists of users. sudo adduser xbmc Enter your desired password twice, in my case I usedxbmcfor user and password.Note: When typing your password, it will not be shown on your screen, not even a mask or asterisk.
Reference Image:
Step 7: Create a script to auto-start XBMC upon user login.
sudo nano /etc/init/xbmc.confAnd copy the following and paste (right-click paste) it to your command-line
# Autostart script: Thank you "Matt Filetto" for authoring this.

env USER=xbmc
start on (filesystem and stopped udevtrigger)
stop on runlevel [016]
respawn

script
  exec su -c "xinit /usr/bin/xbmc-standalone -- -nocursor :0" $USER
end script
Save the file by pressing
ctrl + o->enter->ctrl + x.Then do the following: sudo chmod a+x /etc/init/xbmc.conf
Step 8: We’re almost there, lets test our configuration and do a reboot.
Reboot your XBMC machine by typing: sudo reboot Now, watch your XBMC machine and reboots straight to XBMC’s front-ui.
If it booted straight to the User Interface, then you’ve successfully installed and configured XBMC. If not, then you might have done something wrong. Review the steps above and make sure you did it correctly.
Step 9: If it booted up correctly, then you did it! You may now proceed to Part 3B of this guide.


Part 3-B: XBMC-Plex Configuration
This part of the guide will cover the steps on how to configure XBMC with Plex Media Server. DLNA and UPnP setup shall also be covered in this guide, so make sure your media files and media drives are ready. For this guide, where going to configure XBMC as our HTPC’s front-end, while we set Plex Media Server as the backend server for our media files, as well as, DLNA and UPnP server for known DLNA certified devices (Smart-TVs, SmartPhones, StreamBoxes and etc.)
We’re going to use an XBMC add-on for this, which is PleXBMC.
This add-on will let your play media files served by Plex Media Server. So in addition to XBMC’s own media collection, you could also play media files from Plex’s media library. Remember that we’ve installed a stand-alone version of XBMC on a server edition of Ubuntu 14.04. We need again to use the command-line to download and configure the Plex addon for XBMC. So let’s get started.
Step 1: Let’s SSH again to our XBMC machine using our terminal (Putty.exe if you’re on Windows). Then let’s download the source file for Plex’s XBMC-addon.
Go to your command-prompt again and make sure you’re on your HOME directory. If not, just type
cd ~and press ENTER.Your command-line should look similar to this:
chubbable@htpc:~$Copy the command below and paste it (right-click paste) to your command-line and press enter:
wget http://hippojay.github.io/repository.plexbmc.addons/download/repository.plexbmc.addons/repository.plexbmc.addons-3.0.0.zipThat should download the PleXBMC add-on to your XBMC machine remotely. After downloading the file, you should switch to your XBMC box and manually install the add-on from there, using the front-end GUI.
Step 2: To install the add-on, use your keyboard to navigate to the downloaded file and install it using the XBMC-GUI.
Before we install the add-on, we need to enable XBMC’s Webserver service first.
To do this, navigate to:
System->Settings->Services->Webserver,then enable
Allow control of XBMC via HTTPby pressingEnterkey.This will allow other applications like Plex, iOS and Android Apps control your XBMC box remotely.
To install the PleXBMC add-on, navigate to
System->Settings->Addon.Then select
Install from zip file, then select file location. The add-on file should be underHome folder, so select it and press enter key.Browse to select
repository.plexbmc.addons-3.x.x.zip, then pressEnteragain to install it.Step 3: While still under
Addonpage, navigate toGet Add-onsthenPleXBMC Add-ons for XBMC->Services->PleXBMC HelperandInstall.Step 4: While still under
Addonpage, navigate toVideo Add-ons, just belowServicesmenu.Then select
PleXBMC, pressEnterkey andInstallthe addon. After this, hit backspace a few times until you reach the main front-end menu. Select thePowericon to reboot your XBMC box.Reference Images:


Step 5: After rebooting your machine, a notification message should appear (bottom-right corner), stating
PleXBMC Helper has started.This indicates that the PleXBMC add-on have been successfully installed and configured.
Reference Image:
To continue with the procedure, navigate to
Videos->Add-ons->PleXBMC.You should be taken to a new menu page. Now, navigate to ->
Moviesmenu to browse Plex’s media library remotely from within XBMC.If you see a lists of media categories, then you’ve connected successfully to the DLNA/UPnP service.
Reference Images:


At this point, you already have access to Plex Media Server’s UPnP/DLNA service, using PlexBMC add-on.
But there is another mode to access your Plex Media Library using XBMC as DLNA/UPnP Client.
To do this, follow the steps below.
Step 5.1: Navigate to
Videos->Files->Add Videos->Browse->UPnP.Then wait for a few seconds ’till it shows your Plex Media Server machine’s name. Keep in mind that you must have already configured Plex as DLNA server, and that you have disabled DLNA service from XBMC. When you see your Plex machine already listed in this page, select it and hit
OKbutton to continue.Reference Image:

Step 5.2: Navigate to folder
Video->Movies->All Moviesand then hitOKbutton.You’ll be taken to a confirmation page, hit OK once more and you Plex Video Library should be now accessible via XBMC.
To access the folder from XBMC’s interface, navigate to
Videos->Files->The-Name-Of-Your-Plex-Media-Library.Reference Images:


Note: If you wanted to use XBMC’s Movie Menu, then just add the folder path to your movie files as media source for your XBMC Movie Menu. So your XBMC movie folder, shares with Plex’s media folder, under the same machine.
Step 6: Configure transcoding feature from Plex and enable DLNA service, but disable it from XBMC.
6.1: To disable UPnP/DLNA service from XBMC, navigate to:
System->Settings->Services->UPnP.Then disable
Share video and music libraries through UPnPandLook for remote and UPnP players.Just select the entry with directional keys and press enter to enable/disable it.
6.2: Enable DLNA from Plex
Open a browser and navigate to
http://ipaddress-of-your-server:32400/manage,then from the upper-right corner of the page, click the wrench icon to open the settings page.
Click
Serverfrom the left-hand part of the page and then clickShow Advancedmenu under it.Then from the left-pane, look for
DLNAmenu and click on it, new page should open.Enable
DLNAby ticking the check-box, then click save changes. You have now configured DLNA service under Plex.6.3: While still under the settings page, configure transcoder setting by clicking
Transcodermenu from the left-pane, and then clickShow Advancedmenu from the upper-right pane.Look for a drop-down selector labeled
Transcoder quality, and click on it and selectAutomatic.You may set this in automatic settings for now, but you may experiment with the other settings (ie: prefer higher speed or higher quality encoding). Click
Save Changesand you’re done.And that’s it! You’ve configured XBMC with Plex as it’s media back-end and DLNA server.
In case you didn’t follow the written guide, I’ve prepared a video guide on how to do the steps mentioned above.
So for visual learners like you, watch the video guide from my youtube channel.


Part 4: DLNA and UPnP Client Connection
Setup and Testing So we already have configured Ubuntu XBMC, DLNA in Plex’s settings, now it’s time to test our setup and playback some files to our client device or application. There are various ways to test if a DLNA or UPnP client would be able to connect to your XBMC DLNA server. One way is to use another instance of XBMC by using Plex’s media library as source and another by using the PleXBMC add-on, which we’ve already configured from the steps above. Another is to use software client such as
Windows Media player as DLNA client or third-party apps like BubbleUPnP. — Please see list of UPnP clients for your reference.
- Using XBMC folder source feature. Add Plex media collection just like when you’re adding a folder location as media source in your XBMC setup.
To find out how you would do this, watch my short video guide .
- Using DLNA capable software like BubbleUPnP.
Watch this video guide to see how I’ve set it in an Android-based device.
Conclusion
What we have accomplished here, is that we’ve created a media server and streamer, an HTPC, and a DLNA/UPnP server, all under one box. We have configured Plex Media Server as our media back-end, a DLNA and UPnP Server, and the most notable feature is, its encoding or transcoding capability. The very advantage of this is, you don’t have to encode your media files prior to streaming. So for instance you have a 1080p MKV movie file that you wanted to stream to your Smartphone, but couldn’t handle it, Plex’s on-the-fly transcoding capability will effectively handles this and let’s you stream your file to a compatible format with your DLNA/UPnP capable Smartphone or any devices you might have. On top of this, you could easily attached another XBMC box to your network and configure it to use your Plex + XBMC box as your DLNA/UPnP server and streamer. I hope this guide had helped you in building your XBMC-DLNA media server. If you have questions or comments with regard to this guide, please feel free to write your comments below.